Sunday, January 24, 2010

sewing with Greg

I went over to Greg's tonight to burn our propellant-filled straws in the strand-burner. The first task was to sew fine wires in the propellant so they can be used to determine the burn rate.


The strand burner is collecting 2 different bits of data: the speed that the propellant is burning through the straw and the pressure in the burn chamber. In the picture below, you can see the gigantic pressure transducer sticking off the burn chamber and the wires all connected to the other end. Everything goes into the box on the floor which then goes to the computer via the DATAQ.


Speaking of pressure transducers, Greg got a couple of these spectacular, tiny transducers!


Good stuff.

Saturday, January 09, 2010

Scouts at EcoCycle

Unloading for people.  The training about what and why is really interesting.

Posted via email from mrtidy's posterous

Shelved the PIC

I've heard from Kelly and then from Ken that the Arduino is the way to go for a hobby embedded project. I had been using the PIC for the FTH project but Michael and I discussed the Arduino and decided we really should take the advice. I bought the ATmega168 with Arduino bootloader installed and built the supporting circuit around it and was up and running within a couple hours. The Arduino is as impressive as people made it sound - seriously good stuff.

Michael started looking at the MsTimer2 library to easily hook into the Timer2 so we can get a reliable interrupt for reading the pressure transducers. I put that into the app and did some testing with delays and Serial printing to verify that Timer2 really would interrupt loop, delays, and Serial. It looks good so far.

Here's a clip of code that sets up Timer2 to just print 'Reading Transducer.' and then a Serial call that should happen about the same time as the interrupt. I got lucky in the timing and feel like it proved itself.


void setup() {
Serial.begin(BAUD_RATE);
Serial.println("FTH-Arduino Booting...");
...
// Read the transducers @ 1kHz
MsTimer2::set(1000, readTransducer);
MsTimer2::start();
}

void loop() {
delay(4000);
Serial.println("Boo");
...


void readTransducer() {
Serial.println("Reading Transducer.");
}


Here's the serial output.


FTH-Arduino Booting...
Reading Transducer.
Reading Transducer.
Reading Transducer.
BoReading Transducer.
o
Reading Transducer.


I've still got the PIC code in Bit Bucket and may build something with the PIC in the future but for now I'm loving the Arduino. Here's the current breadboard.

Sunday, January 03, 2010

Motor test

Download now or watch on posterous
VIDEO0007.3gp (1400 KB)

First video of John's motor test.

Posted via email from mrtidy's posterous

Saturday, December 26, 2009

sledding fun

Has fun sledding today - great hill!  Adam and Griffin were there so that was extra fun for the kids.  Blake and Kimberly sledded a bit with Asher and even pulled him up the hill a couple times!  :)

Posted via email from mrtidy's posterous

Friday, December 18, 2009

moving servo via pot; even has a blinking LED

After 2 days without electronics due to illness, I am feeling better and was happy to pull out the stuff. Shanelle wasn't so happy but we watched a movie while I played. I read the oscillator section in the 18F2455 datasheet and felt a lot more comfortable with the oscillator config; in addition, I learned that PWM uses timer 2 so I learned about the pre / post scalers there. I set everything up and was confident that I had the correct timing values but wasn't getting reliable servo movement (servo wasn't dancing either so I was thinking that I had made progress). Michael suggested batteries; I set up an LM7805 and tried driving the servo off my crappy power supply again but using 12V + LM7805; servo still pulsing; Michael suggested batteries. I tried batteries on the servo and now had a stable servo :)

I added a potentiometer to the circuit and adjusted the code to read the pot and position the servo accordingly. I put a video on youtube and then shortened the delay between reads. We're really getting somewhere now :) This code is responsive and good enough to pass along to Greg for testing with a valve and servos while I work on it more to actually considering the pressures and what they mean.


#include
#include
#include
#include

// app uses internal oscillator, RA6 for IO
#pragma config FOSC = INTOSCIO_EC
// OSCCON = 0b01110000; should switch to 8Mhz ??

#pragma config BOR = OFF // Brown out reset
#pragma config LVP = OFF // Low voltage programming
#pragma config WDT = OFF // Watchdog timer

// use pin 11 for basic LED indicator
#define LEDPin LATCbits.LATC0
#define LEDTris TRISCbits.TRISC0

void main() {
// pre / post scalers at 1:16 / 1:2
T2CONbits.T2CKPS1 = 1;
T2CONbits.T2CKPS0 = 1;
T2CONbits.T2OUTPS3 = 0;
T2CONbits.T2OUTPS2 = 0;
T2CONbits.T2OUTPS1 = 0;
T2CONbits.T2OUTPS0 = 1;

// the period is 25ms
OpenPWM1(250);

// TODO - understand all these flags
OpenADC(ADC_FOSC_8 & ADC_RIGHT_JUST & ADC_0_TAD,
ADC_CH0 & ADC_INT_OFF & ADC_VREFPLUS_VDD & ADC_VREFMINUS_VSS,
0b1011);
SetChanADC(ADC_CH0);

LEDTris = 0; // make sure LED pin is an output pin
LEDPin = 1; // turn LED on
while(1) {
LEDPin = ~LEDPin;
Delay10KTCYx(5); // (.2s delay between reads)

ConvertADC();
while(BusyADC());
// through experimentation, I found that a 'duty cycle' between
// 18 and 81 was about right; my pot in my circuit is giving
// 0 to 4.2V so I'm multiplying by 1.2; the ReadADC returns a
// 10 bit result so dividing by 16 to put me 0 to 63
SetDCPWM1(18 + ((int) (1.2 * ReadADC()) >> 4));
}
}

Tuesday, December 15, 2009

first time with MPLAB and PIC

Edward, Greg, and I have been Waving about a Fantasy Throttleable Hybrid rocket. The electronics for the rocket are interesting to me, and the machining of the rocket parts is beyond my abilities, so I'm setting up an environment to work on the controller for the rocket. I'm new to programming the PIC but am interested since it is used in so many projects.

It seems common for hobbyists to develop in ASM for the PIC but I chose C. To get some hand-holding, I went through Tutorial 4 at pic18f.com and it was exactly what I needed from an introduction. Here are a few bits that I had to bump into myself.

PICkit2 Kinda Tricky with VirtualBox


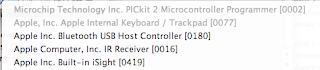
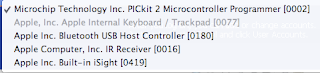
I use a MacBook as my primary machine and do most things related to rocketry within a WinXP VM using VirtualBox. I figured I would simply plug in the PICkit2 (it is USB), assign it to my VM, and go on with the Tutorial. When I plugged in the PICkit2, it appeared in the USB list in my VM but it was Unavailable. I checked the VirtualBox forums and there were some special chicken dances that people claim work but the following steps appear to be reliable for me.

  1. Set up USB Filter for PICkit2 and put at top of VM config.

  2. Boot VM

  3. Plug in PICkit2 at Windows log-in screen.


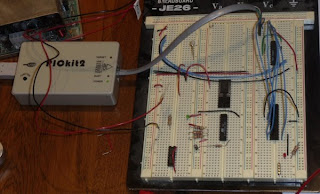
Here are some pictures:


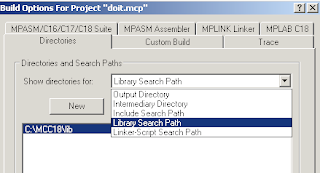
MPLAB Library Path needs setting


It is mentioned in the tutorial that the Library Search Path will probably need to be set but I assumed that since I went with all defaults on my install that it would be already set. It wasn't - I got a build error telling me that c018i.o was not found. I just went in to Build Options..., clicked on Directories tab, changed the drop-down to Library Search Path, and set the value to C:\MCC18\lib.


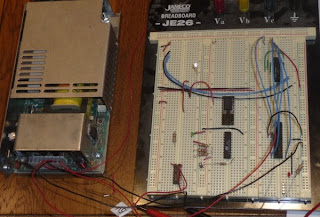
Run App using PICkit2 / USB Power


Just like the Tutorial said, you can say "Programmer -> Release from Reset" to run the app that is in Flash on the PIC. You can do "Programmer -> Set Vdd Off" to turn the PIC off. Neato - easy peasy.


Run App using External Power


Once the PIC is programmed, you can remove the PICkit2 and plug in a 5V power supply. Positive goes to pin 20 on the 18F2455 that I'm using and Ground goes to pins 8 and 19. As soon as power is turned on, the app in Flash runs.

Thursday, October 29, 2009

isaac in office

I suppose this is the real reason Isaac cleaned the office - he has set up his computer and is now 'working' with me.

Posted via email from mrtidy's posterous

Old work swag

Isaac bumped into that while cleaning my office.  Fun fun.

Posted via email from mrtidy's posterous

Sunday, October 25, 2009

Wednesday, October 14, 2009

Thor RockSim (Crikey)

Reminding Greg what BSD Thor looks like.  Rocket name is Crikey.

Posted via email from mrtidy's posterous

Monday, October 12, 2009

rocket repairs and thor

I am a huge fan of the kits from Semroc and my Explorer and Arcas have been flying for a couple years.  My most recent flight on the Arcas used an F42T and 2 of the fins were ripped off.  I was never real happy with my fin alignment on the Arcas so I took the opportunity to remove all the fins and reseat them.  The fins are all in place and this time I used a bit more epoxy and fiberglass filler.  The Arcas is in serious need of a paint job but I think that these fins will be solid!

The Explorer had a cracked fillet.  The crack survived a few flights on E motors but I wouldn't be confident putting an F in it as it was.  I ground out the old fillet, sanded, and then put in a few fillet.  I love this rocket and have flown it at many parks and both NCR launch sites.  I plan to fly it at the Nov NCR launch (if my Shanelle lets me go).

I'm finally making progress on the Thor.  Curtis has been making a lot of noise and I'm even thinking he really is going to get the airframe to me.  I used JB Weld to attach the fins to the motor mount tube and am now in the process of putting in large JB Weld fillets.  Sometime in the near future, Warren M is going to help me do tip to tip fiberglassing on the fins and then when the airframe arrives it will pretty much just slip on.

Posted via email from mrtidy's posterous

Thursday, October 08, 2009

Snowing a bit in Boulder

That's not keeping Zoe from checking for rabbits during break-time.  She's found a couple this week but, fortunately for me, hasn't caught any.

Posted via email from mrtidy's posterous

Monday, October 05, 2009

App Engine Redirects - some good some bad

I'm working on authn and authz for my app that uses App Engine. I was hoping to force HTTPS and make it so DELETE was only available App Engine administrator (i.e. me and others on the project). The force of HTTPS is obviously done in config and I would prefer the DELETE authz info in config as well because it would save a lot of coding.


<security-constraint>
<web-resource-collection>
<web-resource-name>default</web-resource-name>
<url-pattern>/*</url-pattern>
</web-resource-collection>
<user-data-constraint>
<transport-guarantee>CONFIDENTIAL</transport-guarantee>
</user-data-constraint>
</security-constraint>
<security-constraint>
<web-resource-collection>
<web-resource-name>admin</web-resource-name>
<url-pattern>/buckets/200908/bucket/*</url-pattern>
<http-method>DELETE</http-method>
</web-resource-collection>
<auth-constraint>
<role-name>admin</role-name>
</auth-constraint>
</security-constraint>


After setting that in my web.xml file and deploying, I was able to immediately curl and browse and verify that http redirects to https.


$ curl -i -X GET http://mrtidy.appspot.com/buckets/200908/bucket/
HTTP/1.1 302 Found
Location: https://mrtidy.appspot.com/buckets/200908/bucket/
Date: Mon, 05 Oct 2009 02:14:42 GMT
Content-Type: text/html
Server: Google Frontend
Content-Length: 0
X-XSS-Protection: 0


Super duper.


$ curl -i -X DELETE https://mrtidy.appspot.com/buckets/200908/bucket/1
HTTP/1.1 302 Found
Location: https://www.google.com/accounts/ServiceLogin?service=ah&continue=https://mrtidy.appspot.com/_ah/login%3Fcontinue%3Dhttps://mrtidy.appspot.com/buckets/200908/bucket/1<mpl=gm&ahname=...2
Date: Mon, 05 Oct 2009 02:22:26 GMT
Content-Type: text/html
Server: Google Frontend
Content-Length: 0
X-XSS-Protection: 0


I was hoping for a 403 there. I guess it isn't bad but I don't like it that an auth failure gives a 302 status rather than 403. Thinking about now whether I want to stick with this convenience or move the authz for DELETE to code and return my 403 status.

Sunday, October 04, 2009

Beautiful in Broomfield!

Terrible weather at the launch site this morning but it is great in Broomfield.  I think Zoe is pleased at having to ditch the launch early and come home to play.

Posted via email from mrtidy's posterous

Waver closed NCR 20091004

Bad weather again this morning so the waver was closed and we've taken down the pads.  Vendors are gone too.

Posted via email from mrtidy's posterous