This particular one can be found by searching ebay for M168 Transistor Tester. You get no instructions in the kit but you can search for Karl-Heinz Kubbeler transistor tester and get instructions there if you like. In short, you plug something in, press the reset button, get some nice info, and then the display will shut off in a couple seconds.
Saturday, February 14, 2015
Transistor Tester
I had ordered a Transistor Tester a while ago on eBay. I have been having trouble reading the markings on some of my diodes and capacitors so I was hoping to find a measurement tool for them. I was shocked to find that kits of the OSS Transistor Tester circuit run around $15 - seems like a no brainer to buy one and try it out. I finally built mine today and I love it.

This particular one can be found by searching ebay for M168 Transistor Tester. You get no instructions in the kit but you can search for Karl-Heinz Kubbeler transistor tester and get instructions there if you like. In short, you plug something in, press the reset button, get some nice info, and then the display will shut off in a couple seconds.
This particular one can be found by searching ebay for M168 Transistor Tester. You get no instructions in the kit but you can search for Karl-Heinz Kubbeler transistor tester and get instructions there if you like. In short, you plug something in, press the reset button, get some nice info, and then the display will shut off in a couple seconds.
Friday, January 02, 2015
perf version of IR Repeater
Michael did the tedious work of laying out this version of the IR Repeater with VeeCAD on a perf board. I finally got this version built and am excited to be testing it out. Michael has also done the layout for a printed circuit board so I hope to send away for that while the perf board version gets exercised.

The picture above shows the perf board in use. Instead of a micro USB cable I'm using a standard USB B cable for power. The picture below shows the completed perf board version.

I made a lot of mistakes in building it so it took me quite a long time to get this done. Most of the mistakes were due to getting myself confused from flipping the board over differently than I was thinking and soldering things incorrectly. I'm lucky I didn't burn out anything soldering / desoldering over and over. I moved a few things around based on late component changes that I made: PR1 and JP2 are completely different shapes in this than in the original specs I provided. Those changes also caused me to make some mistakes.

This is the underside of the completed board including a major mistake. I had the ground hooked up incorrectly on the RJ45 header: pin 5 instead of pin 4 - oops. I didn't catch this one until I started testing. I didn't hurt anything - the LEDs were just always on so it was pretty easy to spot quickly. Below is the corrected version.

There is one other major mistake that I made that I couldn't correct with desoldering: I was mistaken about what pin 1 on RJ45 was so I have the RJ45 backwards. Pin 1, at least on this SF breakout, maps to brown rather than white-orange. I tried to desolder and flip the breakout from the header but I couldn't get it off. I didn't want to redo the header connections so I ended up making a temporary RJ45 cable that just had all the wires backwards on the one side.
It isn't ideal that I ran wires on both sides of the board but I found that easiest. I really appreciate Michael's work laying this out - its awesome to have a compact version running with near-final connectors and a layout closer to what will be on the printed circuit.
Monday, December 15, 2014
baking IR Repeater
I've adjusted the IR Extender Mark 4 circuit now to fit the parts that I have easily available and to be powered by USB (5V). I want it powered by USB because I have multiple devices in the cabinet with it that have USB connectors on them and a couple of them are always on. Now that I'm happy with the circuit, I have it on a proto board in the cabinet and I've done a final mounting of the IR Receiver.


I had originally intended to put the receiver in the middle of the Wii Sensor Bar but I decided it would still be subtle on its own below the sound bar and much easier to mount there.
Here are the notes about what I've modified in the original Mark 4 circuit:
I'm now going to let things sit and bake for a few days. I've started learning EaglePCB to lay out a board so I can get one printed and get this into a proper case. EaglePCB is going to be a challenge.
I had originally intended to put the receiver in the middle of the Wii Sensor Bar but I decided it would still be subtle on its own below the sound bar and much easier to mount there.
Here are the notes about what I've modified in the original Mark 4 circuit:
- R1 changed to 470R
- C1 removed
- Z1 removed
- Q1 changed to PN2222
- C3 removed
- Q2 changed to PN2222
- R6 changed to 47R
- R7 changed to 220R
- LED1 replaced with 2 red LEDs
- LED3 removed
I'm now going to let things sit and bake for a few days. I've started learning EaglePCB to lay out a board so I can get one printed and get this into a proper case. EaglePCB is going to be a challenge.
Monday, December 08, 2014
IR Repeater Progress
The first prototype is now working for the IR Repeater. I'm using the IR Extender Mark 4 circuit powered by a 9V battery. There is an extra fat wire connected to the circuit that isn't currently used; it is a USB cable that I'm hoping to use to power this rather than a 9V. My next step is to build a copy of this on another breadboard and modify it to use only 5V instead of the 9 / 12V most other people use.

Above is the prototype in the cabinet in use. I'll make it more subtle once I get it powered the way I want. I intend to run the IR LED under the mat and have the breadboard closer to the hole in the rear of the cabinet. You can see a blue wire going thru the rear of the cabinet and break into 2 to connect to the breadboard. One of the bundles from the blue wire goes to the IR Receiver and the other connects to a red LED that can be used for trouble-shooting. The blue wire is terminated in the wall via a CAT 5 connector.

Above is the panel behind the cabinet. The wires there run to a panel behind the TV. Behind the TV is another CAT 5 cable with the IR Receiver and indicator LED on. You can see it hanging down below the sound bar in the picture below. Once I'm happy with everything, I'll put the LED in the wall and the IR Receiver on the bottom of the sound bar so none of it will be noticeable.

To make sure that the wiring and connectors were going to work out I build this tester. It is very similar to the one I used in my initial sensor bar and IR Repeater tests but I'm using all of the wires needed for the IR Receiver and indicator LED here. I plugged in the powered side by the cabinet and the LED side behind the TV. The lights came on so I was happy. Note that there are reminants of a different circuit on this breadboard. All that was required for this test was the 9V battery and resistor.

Above is the prototype in the cabinet in use. I'll make it more subtle once I get it powered the way I want. I intend to run the IR LED under the mat and have the breadboard closer to the hole in the rear of the cabinet. You can see a blue wire going thru the rear of the cabinet and break into 2 to connect to the breadboard. One of the bundles from the blue wire goes to the IR Receiver and the other connects to a red LED that can be used for trouble-shooting. The blue wire is terminated in the wall via a CAT 5 connector.
Above is the panel behind the cabinet. The wires there run to a panel behind the TV. Behind the TV is another CAT 5 cable with the IR Receiver and indicator LED on. You can see it hanging down below the sound bar in the picture below. Once I'm happy with everything, I'll put the LED in the wall and the IR Receiver on the bottom of the sound bar so none of it will be noticeable.
To make sure that the wiring and connectors were going to work out I build this tester. It is very similar to the one I used in my initial sensor bar and IR Repeater tests but I'm using all of the wires needed for the IR Receiver and indicator LED here. I plugged in the powered side by the cabinet and the LED side behind the TV. The lights came on so I was happy. Note that there are reminants of a different circuit on this breadboard. All that was required for this test was the 9V battery and resistor.
Wednesday, December 03, 2014
Sensor Bar Mod
We need to modify our Wii Sensor Bar for the same reason that we're making an IR Repeater: the Wii is in a cabinet and I want to use ethernet cables for accessories.

I had read that the wires inside were lacquer-coated but I didn't know much more. The wires are stranded and appear to have some nylon running with them. I separated the wires, cut off excess nylon, and then soldered to Cat 5 cable that I put ends on to plug into the wall. I chose to use solid blue (pin 4) to connect to the copper colored wire in the Sensor Bar and solid brown (pin 8) to connect to the red-tinted wire in the Sensor Bar.

The cables are now ready for testing with the Wii. The resistance checks out and there don't appear to be any shorts so I don't expect trouble but I can't test on the Wii until tomorrow.
You pressed a button

The DVD player will actually be in a cabinet with solid wood doors - that is, no IR thru the doors and I'd like to keep the doors closed. The DVD player is used for Netflix, Amazon, etc. so we rarely have to touch it. I'd prefer to be able to point the remote at the TV so I need an IR repeater. It is only about $25 to buy a repeater but I thought it would be an interesting project and I have most of the parts around. Ultimately, I plan to use a 555 with some basic supporting components (IR Extender Mark 4) in the cabinet powered via the USB port from the Wii or DVD player. A wire will have to run thru the wall to the IR receiver which will be right below the TV. I had some doubts that the signal from the IR receiver would go thru such a long run with multiple connectors so I did a couple simple tests before building the Mark 4.
I used the very basic test setup from http://allaboutee.com/2011/07/10/arduino-infrared-sensor-code/

When the code from that page is uploaded to the Arduino and then you press a button you see "You pressed a button" on the serial monitor. That worked as expected. It was nice to get validation that the remote was 38kHz - I assumed it would be because that's what I've read that most are these days but nothing is ever simple.
Between the cabinet and the TV, I've run 1 HDMI, 1 Component, and 2 ethernet cables. I don't actually need ethernet at the TV at the moment so I'm using 1 of them for the IR repeater. So there is a Cat 5e run of about 10 feet in the wall, 2 jacks / plugs, and then about 4 feet of cable at each end for connecting to the components.

I was pleased to read, "You pressed a button" in the serial monitor when I used the remote. The receiver appears to be plenty sensitive still as I don't have to be close or pointing the remote at the IR receiver.
I feel like it is safe to move on and build the Mark 4.
Monday, April 29, 2013
added static IP to Raspberry Pi to make it easy to find
I don't want to change the eth0 interface in the RPi to stop using DHCP because I like getting system config from DHCP. I don't want to set up DHCP reservations for my RPi because that's an extra step that doesn't provide any real advantage. To make my RPi easy to find, I've added this section to the end of the /etc/network/interfaces file.
auto eth0:1
iface eth0:1 inet static
 address 192.168.0.30
 netmask 255.255.255.0
 broadcast 192.168.0.255
 network 192.168.0.0
 gateway 192.168.0.1
With this I get a static IP address of 192.168.0.30 that I know I can always use to find my RPi but I also get the benefit of DHCP on (such as DNS config).
Saturday, December 24, 2011
jslint config in sublime-jslint
I'm new to Sublime Text but I'm quickly becoming a fan. Based on Kelly's recommendation, I installed Sublime Text 2 and Sublime Package Control.
After doing some basic editing I decided to go get a jslint package. I installed sublime-jslint and ran it. Easy peasy but I got warnings because I like 2 space indents instead of 4 in my code and some node-specific stuff.
I changed my user settings in the jslint package to add configuration options. The documentation from sublime-jslint had the info on how to configure it but it wasn't totally clear so took me a couple tries to get it right.

Here are the entire contents of my sublime-jslint.sublime-settings file:
Now when I use jslint (by clicking ctrl-j) I get nice results.
After doing some basic editing I decided to go get a jslint package. I installed sublime-jslint and ran it. Easy peasy but I got warnings because I like 2 space indents instead of 4 in my code and some node-specific stuff.
jslint:mystuff.js:5:12:'require' was used before it was defined.
jslint:mystuff.js:6:3:Expected 'winston' at column 5, not column 3.
jslint:mystuff.js:7:3:Expected 'service' at column 5, not column 3.
jslint:mystuff.js:9:1:'exports' was used before it was defined.
jslint:mystuff.js:10:3:Expected 'use strict' at column 5, not column 3.
jslint:mystuff.js:11:3:Expected 'var' at column 5, not column 3.
jslint:mystuff.js:12:5:Expected 'server' at column 9, not column 5.
jslint:mystuff.js:13:7:Expected 'winston' at column 13, not column 7.
...
I changed my user settings in the jslint package to add configuration options. The documentation from sublime-jslint had the info on how to configure it but it wasn't totally clear so took me a couple tries to get it right.

Here are the entire contents of my sublime-jslint.sublime-settings file:
{
    // https://github.com/fbzhong/sublime-jslint/wiki/Available-jslint4java-options
    "jslint_options": "--indent 2 --node"
}
Now when I use jslint (by clicking ctrl-j) I get nice results.
mystuff.js lint free!
jslint: ignored 0 errors.
Friday, December 09, 2011
Remap fn on MacBook Pro in VirtualBox
I use LinuxMint 12 in VirtualBox on my MBP for non-work projects. I think that OS X is an excellent environment for software development but I am also mighty pleased with LinuxMint. I use a VM for non-work projects just to make sure that everything stays very separate. I decided today that I'll never get used to where the Control key is so I went looking for a way to swap the fn and Control keys. I saw a couple separate sites reviewing KeyRemap4MacBook so I decided to try it even though most forums said that you can't remap the fn key.
I use Lion so I downloaded version 7.5.0 for Lion. The zip file drops a pkg. I installed that and got a System Preference added to my system. (I did have to reboot.) The new preference is KeyRemap4MacBook: at the center of the bottom row.

I opened the widget and was immediately dazzled! Fn to Control_L (only in virtual machine, RDC) I enabled that, fired up VirtualBox (I'm using v4.1.6), and booted my VM.

I could hardly wait to try it...

Woohoo!
Sunday, November 20, 2011
moving simple node app into heroku
I went thru the Getting Started With Clojure on Heroku/Cedar last night. Great instructions and I love the model but I wanted to play more. I don't have any fragments of real Clojure projects available that I can send to Heroku so I tried sending a nodejs project today.
There is a great article in the Heroku devcenter: Getting Started With Node.js on Heroku/Cedar. Smooth and easy to follow. There are a couple minor variations that I made from it: I named my app and I switched from the express module to the http. If you don't specify an app name, then a fun one is chosen for you but I wanted to see if I could set a name and that did work. As for express vs http - I have no real preference - I am just more familiar with http.
In the tutorial, they have you use $ heroku create --stack cedar to create the app. If you just put a name at the end of the line then you'll get a name you choose rather than something like starfish-mergatroid.
The express module looks fine and that probably could have worked for me. I just wanted to use http because that's what my code already had. Here's the main clip showing how I have http where the tutorial used express.
When I start using foreman it still starts on port 5000 like express does. The only difference that I can see is that the package.json needs the correct dependency info and the functions for express vs http are different.
Heroku specifically requires v0.4.7 of Node so I changed my local environment to that version.
You have to create a package.json file so that Heroku knows that this is a Node app. I didn't know what versions to specify in the dependencies list so I ended up doing npm list.
Notice that there are 2 versions of node-static. I had been using v0.5.3 and I put that version into the package.json file but I got a failure during deployment.
To resolve that I just updated to a newer version of node-static, updated my package.json file, and then re-deployed.
One of the many cool things about Heroku is that I still have console access. Note that I can see the config settings that were loaded.
Getting Started Article
There is a great article in the Heroku devcenter: Getting Started With Node.js on Heroku/Cedar. Smooth and easy to follow. There are a couple minor variations that I made from it: I named my app and I switched from the express module to the http. If you don't specify an app name, then a fun one is chosen for you but I wanted to see if I could set a name and that did work. As for express vs http - I have no real preference - I am just more familiar with http.
Creating a Named App
In the tutorial, they have you use $ heroku create --stack cedar to create the app. If you just put a name at the end of the line then you'll get a name you choose rather than something like starfish-mergatroid.
$ heroku create --stack cedar estimacci-server
Creating estimacci-server... done, stack is cedar
http://estimacci-server.herokuapp.com/ | git@heroku.com:estimacci-server.git
Git remote heroku added
Using http Module
The express module looks fine and that probably could have worked for me. I just wanted to use http because that's what my code already had. Here's the main clip showing how I have http where the tutorial used express.
var staticFiles = new (static.Server)("static");
server = http.createServer(function(request, response) {
 request.addListener('end', function() {
  staticFiles.serve(request, response);
 });
});
var port = process.env.PORT || 3000;
server.listen(port);
console.log("Static Content Server Started");
When I start using foreman it still starts on port 5000 like express does. The only difference that I can see is that the package.json needs the correct dependency info and the functions for express vs http are different.
$ foreman start
15:41:55 web.1     | started with pid 50671
15:41:55 web.1     | Config loaded:
15:41:55 web.1     | smtp_host: smtp.gmail.com
15:41:55 web.1     | smtp_port: 587
15:41:55 web.1     | smtp_ssl: true
15:41:55 web.1     | smtp_use_auth: true
15:41:55 web.1     | smtp_username: TODO
15:41:55 web.1     | smtp_password: TODO
15:41:55 web.1     | Static Content Server Started
15:41:55 web.1     | 20 Nov 15:41:55 - Your node instance does not have root privileges. This means that the flash XML policy file will be served inline instead of on port 843. This will slow down initial connections slightly. NOTE: this fails with Firefox 4 betas.
15:41:55 web.1     | 20 Nov 15:41:55 - socket.io ready - accepting connections
15:41:55 web.1     | Stream Server Started
Going to Node v0.4.7
Heroku specifically requires v0.4.7 of Node so I changed my local environment to that version.
$ wget http://nodejs.org/dist/node-v0.4.7.tar.gz
$ tar xzf node-v0.4.7.tar.gz
$ cd node-v0.4.7
$ ./configure
$ sudo make install
Looking at Module Versions
You have to create a package.json file so that Heroku knows that this is a Node app. I didn't know what versions to specify in the dependencies list so I ended up doing npm list.
$ npm list
npm info it worked if it ends with ok
npm info using npm@0.2.17
npm info using node@v0.4.7
connect@1.8.0       active installed
express@2.2.0       active installed
express@2.5.1       installed
eyes@0.1.6          active installed
formidable@1.0.7    active installed
mime@1.2.4          active installed
mkdirp@0.0.7        active installed
node-static@0.5.3   installed
node-static@0.5.9   active installed
nodemailer@0.1.2    active installed
npm@0.2.17          active installed
postmark@0.0.4      active installed
qs@0.3.2            active installed
request@0.10.0      active installed
socket.io@0.6.8     active installed
vows@0.5.13         active installed
npm ok
Notice that there are 2 versions of node-static. I had been using v0.5.3 and I put that version into the package.json file but I got a failure during deployment.
$ git push heroku master
Counting objects: 25, done.
Delta compression using up to 2 threads.
Compressing objects: 100% (23/23), done.
Writing objects: 100% (25/25), 56.55 KiB, done.
Total 25 (delta 2), reused 0 (delta 0)
-----> Heroku receiving push
-----> Node.js app detected
-----> Fetching Node.js binaries
-----> Vendoring node 0.4.7
-----> Installing dependencies with npm 1.0.94
npm ERR! Error: version not found: 0.5.3 : node-static/0.5.3
npm ERR! at Request.callback (/tmp/node-npm-y4nm/lib/utils/npm-registry-client/request.js:181:12)
npm ERR! at Request.(/tmp/node-npm-y4nm/node_modules/request/main.js:337:18)
npm ERR! at Request.emit (events.js:64:17)
npm ERR! at IncomingMessage.(/tmp/node-npm-y4nm/node_modules/request/main.js:305:16)
npm ERR! at IncomingMessage.emit (events.js:81:20)
npm ERR! at HTTPParser.onMessageComplete (http.js:133:23)
npm ERR! at Socket.ondata (http.js:1213:22)
npm ERR! at Socket._onReadable (net.js:681:27)
npm ERR! at IOWatcher.onReadable [as callback] (net.js:177:10)
...
To resolve that I just updated to a newer version of node-static, updated my package.json file, and then re-deployed.
$ cat package.json
{
  "name": "estimacci-server",
  "version": "0.0.1",
  "dependencies": {
    "socket.io": "0.6.8",
    "node-static": "0.5.9",
    "nodemailer": "0.1.2"
  }
}
Still Have Console
One of the many cool things about Heroku is that I still have console access. Note that I can see the config settings that were loaded.
clip from server.js that loads config and uses console
var config;
try {
 config = JSON.parse(fs.readFileSync('config.json'));
 console.log("Config loaded: ");
 for ( var i in config) {
  console.log(i + ": " + config[i]);
 }
} catch (e) {
 console.log("Failed to load configuration file.", e);
}
viewing log / console
$ heroku logs
2011-11-20T20:30:47+00:00 heroku[api]: Add-on add logging:basic by jeremiah_p_johnson@hotmail.com
2011-11-20T20:30:47+00:00 heroku[api]: Release v2 created by jeremiah_p_johnson@hotmail.com
2011-11-20T20:31:04+00:00 heroku[slugc]: Slug compilation started
2011-11-20T20:31:05+00:00 heroku[slugc]: Slug compilation failed: failed to compile Node.js app
2011-11-20T20:32:59+00:00 heroku[slugc]: Slug compilation started
2011-11-20T20:33:11+00:00 heroku[api]: Config add PATH by jeremiah_p_johnson@hotmail.com
2011-11-20T20:33:11+00:00 heroku[api]: Release v3 created by jeremiah_p_johnson@hotmail.com
2011-11-20T20:33:11+00:00 heroku[api]: Deploy 25dca6c by jeremiah_p_johnson@hotmail.com
2011-11-20T20:33:12+00:00 heroku[api]: Release v4 created by jeremiah_p_johnson@hotmail.com
2011-11-20T20:33:12+00:00 heroku[web.1]: State changed from created to starting
2011-11-20T20:33:12+00:00 heroku[slugc]: Slug compilation finished
2011-11-20T20:33:16+00:00 app[web.1]: Config loaded:
2011-11-20T20:33:16+00:00 app[web.1]: smtp_host: smtp.gmail.com
2011-11-20T20:33:16+00:00 app[web.1]: smtp_port: 587
2011-11-20T20:33:16+00:00 app[web.1]: smtp_ssl: true
2011-11-20T20:33:16+00:00 app[web.1]: smtp_use_auth: true
2011-11-20T20:33:16+00:00 app[web.1]: smtp_username: TODO
2011-11-20T20:33:16+00:00 app[web.1]: smtp_password: TODO
2011-11-20T20:33:16+00:00 app[web.1]: Static Content Server Started
Monday, June 20, 2011
optimistic about maven android integration
I've been using the maven-android-plugin recently. Here's a little video showing building, deploy, and undeploy of an simple application to my phone. I particularly love the
To get the full benefit of these features in Eclipse we need
Good stuff.
android:deploy and android:undeploy goals.To get the full benefit of these features in Eclipse we need
m2e integration. Luckily, the m2e-android project is making good progress.Good stuff.
Tuesday, June 14, 2011
windows dexdump failure
This is frustrating because it should be such a trivial thing. I don't know what the fix is. I was hopeful that the binary attached to Android Issue 14746 would fix me up but that didn't work out.
In Windows, I was getting a silly-stupid message from dx and then an error from dexdump so I wanted to try a dx / dexdump on Mac for a comparison. I picked a random JAR file.
Good enough. Easy peasy.
That's for real - did you see that in the previous output? That's the whole error message. Neat. So you can't use relative paths and you can't use an absolute path with a space? Perhaps Windows users already know what to really do but I'm just trying to be a good citizen and test a defect fix on Windows without tons of recent Windows experience.
simple dx / dexdump on Mac
In Windows, I was getting a silly-stupid message from dx and then an error from dexdump so I wanted to try a dx / dexdump on Mac for a comparison. I picked a random JAR file.
[jjohnson@jjohnson 20110613]$ cp ~/.m2/repository/commons-lang/commons-lang/2.4/commons-lang-2.4.jar .
[jjohnson@jjohnson 20110613]$ dx --dex --output=test.apk commons-lang-2.4.jar
[jjohnson@jjohnson 20110613]$ dexdump -d -l xml test.apk

<api>
<package name="org.apache.commons.lang"
>
<class name="ArrayUtils"
 extends="java.lang.Object"
 abstract="false"
 static="false"
 final="false"
 visibility="public"
>
...
Good enough. Easy peasy.
simple made difficult
C:\Documents and Settings\Jeremiah Johnson\20110613>copy ..\.m2\repository\commons-lang\commons-lang\2.4\commons-lang-2.4.jar .
C:\Documents and Settings\Jeremiah Johnson\20110613>dx --dex --output=test.apk commons-lang-2.4.jar

UNEXPECTED TOP-LEVEL EXCEPTION:
java.io.FileNotFoundException: commons-lang-2.4.jar (The system cannot find the file specified)
        at java.util.zip.ZipFile.open(Native Method)
        at java.util.zip.ZipFile.(ZipFile.java:127)
        at java.util.zip.ZipFile.(ZipFile.java:144)
        at com.android.dx.cf.direct.ClassPathOpener.processArchive(ClassPathOpener.java:205)
        at com.android.dx.cf.direct.ClassPathOpener.processOne(ClassPathOpener.java:130)
        at com.android.dx.cf.direct.ClassPathOpener.process(ClassPathOpener.java:108)
        at com.android.dx.command.dexer.Main.processOne(Main.java:313)
        at com.android.dx.command.dexer.Main.processAllFiles(Main.java:233)
        at com.android.dx.command.dexer.Main.run(Main.java:185)
        at com.android.dx.command.dexer.Main.main(Main.java:166)
        at com.android.dx.command.Main.main(Main.java:90)
1 error; aborting

C:\Documents and Settings\Jeremiah Johnson\20110613>dx --dex --output="C:\Documents and Settings\Jeremiah Johnson\20110613\test.apk" "C:\Documents and Settings\Jeremiah Johnson\20110613\commons-lang-2.4.jar"
and was unexpected at this time.
and was unexpected at this time.
That's for real - did you see that in the previous output? That's the whole error message. Neat. So you can't use relative paths and you can't use an absolute path with a space? Perhaps Windows users already know what to really do but I'm just trying to be a good citizen and test a defect fix on Windows without tons of recent Windows experience.
final dexdump failure on windows
C:\Documents and Settings\Jeremiah Johnson\20110613>cd ..
C:\Documents and Settings\Jeremiah Johnson>move 20110613 C:\
C:\Documents and Settings\Jeremiah Johnson>cd C:\20110613
C:\20110613>dx --dex --output=C:\20110613\test.apk C:\20110613\commons-lang-2.4.
jar
C:\20110613>dexdump -d -l xml test.apk
E/dalvikvm( 3152): sysMapFileSegmentInShmem not implemented.
W/dalvikvm( 3152): Zip: cd map failed
Unable to open 'test.apk' as zip archive
Not Zip, retrying as DEX
E/dalvikvm( 3152): ERROR: Bad magic number (0x50 4b 03 04)
ERROR: Failed structural verification of 'test.apk'

C:\20110613>dexdump -d -l xml C:\20110613\test.apk
E/dalvikvm( 1740): sysMapFileSegmentInShmem not implemented.
W/dalvikvm( 1740): Zip: cd map failed
Unable to open 'C:\20110613\test.apk' as zip archive
Not Zip, retrying as DEX
E/dalvikvm( 1740): ERROR: Bad magic number (0x50 4b 03 04)
ERROR: Failed structural verification of 'C:\20110613\test.apk'
Sunday, June 05, 2011
jsp pre-compile and proper servlet classloading
Following my previous post, I configured JSP pre-compiling and adjusted my simple WebAppContext a bit to get the servlet classloader working properly. Without fixing the classloader, I couldn't actually use the pre-compiled JSPs. After getting the classloading worked out, I switched from WebAppContext to WebAppProvider: 1) WebAppProvider allows polling for redeploy of the WAR and 2) the WebAppContext is deprecated so I felt like I should use non-deprecated APIs in this new code.
The i-Jetty project is a pretty interesting project but goes a different route than what I'm doing. I followed some of the ideas there but simplified for what I need.
When I started this class, I thought that there would be more to it so it is a regular class. I'll probably make it an inner class if it doesn't get any more complex that this. Right now, this is all that is needed to use the dex version of the servlets in my WAR.
I'm using a simple Maven project within Eclipse for my WAR file. I'm using the standard structure and added the following to the POM. The first chunk pre-compiles the JSPs and then the second chunk runs
The first chunk was pretty must straight out of the
I thought that I'd just need to change the WebAppContext stuff but I ended up also having to adjust the configuration as well. Temp directories are handled differently in the provider stuff and I don't totally understand it. Here's where I'm at with the code that sets up the server and then the configuration.
The i-Jetty project is a pretty interesting project but goes a different route than what I'm doing. I followed some of the ideas there but simplified for what I need.
added configuration to WebAppContext
        // start the Web server for config and maintenance
        webServer = new Server(8080);
        try {
            WebAppContext webapp = new WebAppContext();
            webapp.setConfigurationClasses(new String[] { DexWebInfConfiguration.class.getName(),
                    JettyWebXmlConfiguration.class.getName(), WebXmlConfiguration.class.getName() });
            webapp.setContextPath("/");
            webapp.setTempDirectory(new File("/sdcard/TGP-work/"));
            webapp.setWar("/sdcard/TGP-webapps/TGP-ROOT.war");
            webServer.setHandler(webapp);
        }
        catch (Exception e) {
            Log.d(LOG_TAG, "unexpected exception setting temp: " + e);
        }
DexWebInfConfiguration.java
When I started this class, I thought that there would be more to it so it is a regular class. I'll probably make it an inner class if it doesn't get any more complex that this. Right now, this is all that is needed to use the dex version of the servlets in my WAR.
/**
 * Adds dex support to the classloader used in the Jetty WebInfConfiguration.
 *
 * <code>webapp.setConfigurationClasses(new String[] { DexWebInfConfiguration.class.getName() });</code>
 */
public class DexWebInfConfiguration extends WebInfConfiguration {
    public void preConfigure(WebAppContext context) throws Exception {
        context.setClassLoader(new DexClassLoader(context.getTempDirectory().getCanonicalPath()
                + "/webapp/WEB-INF/lib/classes.zip", context.getTempDirectory().getCanonicalPath(), null, getClass()
                .getClassLoader()));
        super.preConfigure(context);
    }
}
the WAR file
I'm using a simple Maven project within Eclipse for my WAR file. I'm using the standard structure and added the following to the POM. The first chunk pre-compiles the JSPs and then the second chunk runs
dex on all of the compiled code in the WAR (i.e. the JSPs as well as the regular servlets).The first chunk was pretty must straight out of the
jetty-jspc-maven-plugin docs and the second from i-Jetty.
   <plugin>
    <groupId>org.mortbay.jetty</groupId>
    <artifactId>jetty-jspc-maven-plugin</artifactId>
    <version>7.3.0.v20110203</version>
    <executions>
     <execution>
      <id>jspc</id>
      <goals>
       <goal>jspc</goal>
      </goals>
      <configuration>
      </configuration>
     </execution>
    </executions>
   </plugin>
   <plugin>
    <artifactId>maven-war-plugin</artifactId>
    <configuration>
     <!-- use web.xml from jspc rather than src version -->
     <webXml>${project.build.directory}/web.xml</webXml>
    </configuration>
   </plugin>

      <plugin>
        <groupId>org.codehaus.mojo</groupId>
        <artifactId>exec-maven-plugin</artifactId>
        <version>1.1</version>
        <executions>
          <execution>
            <id>generate-dex</id>
            <phase>process-classes</phase>
            <goals>
              <goal>exec</goal>
            </goals>
            <configuration>
              <executable>${android.home}/platform-tools/dx</executable>
              <arguments>
                <argument>--dex</argument>
                <argument>--verbose</argument>
                <argument>--core-library</argument>
                <argument>--output=${project.build.directory}/classes.dex</argument>
                <argument>--positions=lines</argument>
                <argument>${project.build.directory}/classes/</argument>
              </arguments>
            </configuration>
          </execution>
        </executions>
      </plugin>
      <plugin>
        <artifactId>maven-antrun-plugin</artifactId>
        <executions>
          <execution>
            <id>copydex</id>
            <phase>process-classes</phase>
            <goals>
              <goal>run</goal>
            </goals>
            <configuration>
              <tasks>
                <mkdir
                  dir="${project.build.directory}/${project.artifactId}-${project.version}/WEB-INF/lib" />
                <jar basedir="${project.build.directory}" update="true"
                  includes="classes.dex"
                  destfile="${project.build.directory}/${project.artifactId}-${project.version}/WEB-INF/lib/classes.zip" />
              </tasks>
            </configuration>
          </execution>
        </executions>
      </plugin>
switch to WebAppProvider
I thought that I'd just need to change the WebAppContext stuff but I ended up also having to adjust the configuration as well. Temp directories are handled differently in the provider stuff and I don't totally understand it. Here's where I'm at with the code that sets up the server and then the configuration.
MyApp.class onCreate
        // start the Web server for config and maintenance
        webServer = new Server(8080);
        try {
            HandlerCollection handlers = new HandlerCollection();
            ContextHandlerCollection contexts = new ContextHandlerCollection();
            handlers.setHandlers(new Handler[] { contexts, new DefaultHandler() });
            webServer.setHandler(handlers);

            DeploymentManager deployer = new DeploymentManager();
            deployer.setContexts(contexts);
            webServer.addBean(deployer);

            WebAppProvider webAppProvider = new WebAppProvider();
            webAppProvider.setConfigurationClasses(new String[] { DexWebInfConfiguration.class.getName(),
                    JettyWebXmlConfiguration.class.getName(), WebXmlConfiguration.class.getName() });
            webAppProvider.setExtractWars(true);
            webAppProvider.setScanInterval(10);
            webAppProvider.setMonitoredDirName("/sdcard/jetty/webapps/");
            deployer.addAppProvider(webAppProvider);
        }
        catch (Exception e) {
            Log.d(LOG_TAG, "unexpected exception setting temp: " + e);
        }

        try {
            webServer.start();
            Log.d(LOG_TAG, "started Web server @ " + getPublicInetAddress());

            NotificationManager notificationManager = (NotificationManager) getSystemService(Context.NOTIFICATION_SERVICE);
            Notification notification = new Notification( R.drawable.web_server_icon, "WebServer", System.currentTimeMillis());
            notification.flags |= Notification.FLAG_ONGOING_EVENT; // Notification.FLAG_NO_CLEAR;
            Intent notificationIntent = new Intent(this, MyApp.class);
            PendingIntent contentIntent = PendingIntent.getActivity(this, 0, notificationIntent, 0);
            notification.setLatestEventInfo(getApplicationContext(), "Web Server" , "Web Server Listening @ " + getPublicInetAddress(), contentIntent);
            notificationManager.notify(NOTIFICATION_ID_WEB_SERVER, notification);
        }
        catch (Exception e) {
            Log.d(LOG_TAG, "unexpected exception starting Web server: " + e);
        }
DexWebInfConfiguration.java
/**
* Adds dex support to the classloader used in the Jetty WebInfConfiguration.
*
*webapp.setConfigurationClasses(new String[] { DexWebInfConfiguration.class.getName() });
*/
public class DexWebInfConfiguration extends WebInfConfiguration {
/**
* The parent preConfigure is going to load the JAR and class files in so we
* need to adjust the class loader before
*/
@Override
public void preConfigure(WebAppContext context) throws Exception {
String tempDir = getCanonicalNameForWebAppTmpDir(context);
if (tempDir != null) {
tempDir = Environment.getExternalStorageDirectory() + "/" + tempDir;
String dexZip = tempDir + "/webapp/WEB-INF/lib/classes.zip";
context.setClassLoader(new DexClassLoader(dexZip, tempDir, null, getClass().getClassLoader()));
Log.d("Jetty", "Added DexClassLoader for " + dexZip);
}
super.preConfigure(context);
}
}
Saturday, June 04, 2011
running embedded Jetty in Android app
I expect that we'll see this more commonly as more Android-based hardware devices come out other than mobile phones. In this particular case, the Jetty server is intended to drive a dynamic Web-based management tool for an application running on an Android device. I need to get a proper Web app project set up that pre-compiles the JSPs before they get to the Android device but this post is intended to show what libraries are required and how to set up Jetty to run on the Android device. I'm using a regular Android emulator out of Eclipse and a G1 running Cyanogen (API 8) for testing at this point.
I had to use Jetty version 7.3.0.v20110203 to avoid XML validation feature that causes troubles on Android 2.2 devices.
I merged JARs from the Jetty download into a single one to add to my app that I called
I see that a work-around for the IPv4 / IPv6 issue is still required. I used
Since the emulator uses slirp for the guest networking, you have to set up port forwarding from the host. For the G1, I used the real address of the phone (shows up in the status bar). So for the emulator I'd point my browser at
Just to make sure that I could start a server and have it listening as expected, I deployed a simple static app.
This is the list of JARs that I had to put into my app.
Here is the Jetty server clip I put in my app
The next step was to deploy an external servlet via a WAR file. This turned out to be a lot more difficult than I imagined because of checkin r2770 in Jetty-7. It turns out that an XmlParser validation feature was added to Jetty that Android 2.2 doesn't support. Once I moved to a version of Jetty older than that revision I was able to move forward.
This is the list of JARs that I had to put into my app.
The code:
The
Here's the change that I think needs to be dis-armed a bit.
General Stuff
I had to use Jetty version 7.3.0.v20110203 to avoid XML validation feature that causes troubles on Android 2.2 devices.
I merged JARs from the Jetty download into a single one to add to my app that I called
jetty.jar. For example, here's a little shell script I used for my WAR Deployed Web App.
jar xf ../jetty-continuation-*.jar
jar xf ../jetty-http-*.jar
jar xf ../jetty-io-*.jar
jar xf ../jetty-security-*.jar
jar xf ../jetty-server-*.jar
jar xf ../jetty-servlet-*.jar
jar xf ../jetty-util-*.jar
jar xf ../jetty-webapp-*.jar
jar xf ../jetty-xml-*.jar
jar xf ../servlet-api-2.5.jar
jar cf ~/Documents/ECLIPSE_PROJECT_PATH/libs/jetty.jar *
I see that a work-around for the IPv4 / IPv6 issue is still required. I used
  // work-around for Android defect 9431
  System.setProperty("java.net.preferIPv4Stack", "true");
  System.setProperty("java.net.preferIPv6Addresses", "false");
Since the emulator uses slirp for the guest networking, you have to set up port forwarding from the host. For the G1, I used the real address of the phone (shows up in the status bar). So for the emulator I'd point my browser at
http://localhost:8080/ but from my G1 I'd point at http://10.1.1.8:8080/ (of couse, this IP is local to my LAN).
adb -e forward tcp:8080 tcp:8080
Simple Web App
Just to make sure that I could start a server and have it listening as expected, I deployed a simple static app.
This is the list of JARs that I had to put into my app.
- jetty-continuation-7.3.0.v20110203.jar
- jetty-http-7.3.0.v20110203.jar
- jetty-io-7.3.0.v20110203.jar
- jetty-server-7.3.0.v20110203.jar
- jetty-util-7.3.0.v20110203.jar
- servlet-api-2.5.jar
Here is the Jetty server clip I put in my app
onCreate
        webServer = new Server(8080);

        Handler handler = new AbstractHandler() {
            public void handle(String target, Request request, HttpServletRequest servletRequest,
                    HttpServletResponse servletResponse) throws IOException, ServletException {
                servletResponse.setContentType("text/html");
                servletResponse.setStatus(HttpServletResponse.SC_OK);
                servletResponse.getWriter().println("<h1>Hello World</h1>");
                ((Request) request).setHandled(true);
            }
        };
        webServer.setHandler(handler);

        try {
            webServer.start();
            Log.d(LOG_TAG, "started Web server @ " + getPublicInetAddress());

            NotificationManager notificationManager = (NotificationManager) getSystemService(Context.NOTIFICATION_SERVICE);
            Notification notification = new Notification( R.drawable.web_server_icon, "WebServer", System.currentTimeMillis());
            notification.flags |= Notification.FLAG_ONGOING_EVENT; // Notification.FLAG_NO_CLEAR;
            Intent notificationIntent = new Intent(this, MyApp.class);
            PendingIntent contentIntent = PendingIntent.getActivity(this, 0, notificationIntent, 0);
            notification.setLatestEventInfo(getApplicationContext(), "Web Server" , "Web Server Listening @ " + getPublicInetAddress(), contentIntent);
            notificationManager.notify(NOTIFICATION_ID_WEB_SERVER, notification);
        }
        catch (Exception e) {
            Log.d(LOG_TAG, "unexpected exception starting Web server: " + e);
        }
WAR Deployed Web App
The next step was to deploy an external servlet via a WAR file. This turned out to be a lot more difficult than I imagined because of checkin r2770 in Jetty-7. It turns out that an XmlParser validation feature was added to Jetty that Android 2.2 doesn't support. Once I moved to a version of Jetty older than that revision I was able to move forward.
This is the list of JARs that I had to put into my app.
- jetty-continuation-7.3.0.v20110203.jar
- jetty-http-7.3.0.v20110203.jar
- jetty-io-7.3.0.v20110203.jar
- jetty-security-7.3.0.v20110203.jar
- jetty-server-7.3.0.v20110203.jar
- jetty-servlet-7.3.0.v20110203.jar
- jetty-util-7.3.0.v20110203.jar
- jetty-webapp-7.3.0.v20110203.jar
- jetty-xml-7.3.0.v20110203.jar
- servlet-api-2.5.jar
The code:
        webServer = new Server(8080);

        WebAppContext webapp = new WebAppContext();
        webapp.setContextPath("/");
        webapp.setTempDirectory(new File("/sdcard/my-work/"));
        webapp.setWar("/sdcard/my-webapps/my-ROOT.war");
        webServer.setHandler(webapp);

        try {
            webServer.start();
            Log.d(LOG_TAG, "started Web server @ " + getPublicInetAddress());

            NotificationManager notificationManager = (NotificationManager) getSystemService(Context.NOTIFICATION_SERVICE);
            Notification notification = new Notification( R.drawable.web_server_icon, "WebServer", System.currentTimeMillis());
            notification.flags |= Notification.FLAG_ONGOING_EVENT; // Notification.FLAG_NO_CLEAR;
            Intent notificationIntent = new Intent(this, MyApp.class);
            PendingIntent contentIntent = PendingIntent.getActivity(this, 0, notificationIntent, 0);
            notification.setLatestEventInfo(getApplicationContext(), "Web Server" , "Web Server Listening @ " + getPublicInetAddress(), contentIntent);
            notificationManager.notify(NOTIFICATION_ID_WEB_SERVER, notification);
        }
        catch (Exception e) {
            Log.d(LOG_TAG, "unexpected exception starting Web server: " + e);
        }
The
my-work directory gets created fine. I need to push the WAR file out: for the emulator I used adb push ../my-ROOT.war sdcard/my-webappsNext Steps
- I need to submit a patch to Jetty to get a
try / catcharound the XmlParser validation feature that is causing trouble so we can use more recent versions. - I need to set up JSP pre-compiling in my Web project so I can add JSPs to make developing the UI easier.
- I need to dig into the Android device and figure out how to set the low-port listen capability. Right now, I have to listen on the 1024+ port range so I use the common port 80. For a real device, I need to change this to port 80 but that requires a Linux capability change - probably in device boot parameters.
Here's the change that I think needs to be dis-armed a bit.
$ svn diff -c 2770 XmlParser.java
Index: XmlParser.java
===================================================================
--- XmlParser.java (revision 2769)
+++ XmlParser.java (revision 2770)
@@ -107,6 +107,7 @@
             _parser.getXMLReader().setFeature("http://xml.org/sax/features/validation", validating);
             _parser.getXMLReader().setFeature("http://xml.org/sax/features/namespaces", true);
             _parser.getXMLReader().setFeature("http://xml.org/sax/features/namespace-prefixes", false);
+            _parser.getXMLReader().setFeature("http://apache.org/xml/features/nonvalidating/load-external-dtd", validating);
         }
         catch (Exception e)
         {
Monday, May 24, 2010
Eclipse plugin installation with Proxoid on G1
I had figured I'd just be browsing via the tether but then I discovered that I needed another Eclipse plugin. Setting Eclipse to use the proxy was simple enough. I use Proxoid on the G1 and adb on my computer just like I did in my previous tethering post. Rather than start Eclipse with a proxy configured, I adjusted the Eclipse preferences to use the proxy. The risk of adjusting the preferences is that when I'm in the office, I'll forget that I had configured the proxy - my memory for trivial stuff is really that bad.
You have to change the drop-down the Manual before you can edit the HTTP and HTTPS proxies. Since I have adb mapping 8080 for the proxy, that's what I am using in this proxy. Once the proxy is set in Network Connections, plugins installed through regular means.

Good Stuff.
Network Connections for All
I had to install the 1.6 platform so I could create a new app for my phone. Since the Android plugin manages the platform and API installations, I wasn't real confident that the Network Connections proxy would get used. I was pleased to find that Network Connections does affect the ADT properly - I'm somewhere in Iowa between Des Moines and Council Bluffs and getting the platform.

Eclipse -> Preferences... | General -> Network Connections
You have to change the drop-down the Manual before you can edit the HTTP and HTTPS proxies. Since I have adb mapping 8080 for the proxy, that's what I am using in this proxy. Once the proxy is set in Network Connections, plugins installed through regular means.

Good Stuff.
Network Connections for All
I had to install the 1.6 platform so I could create a new app for my phone. Since the Android plugin manages the platform and API installations, I wasn't real confident that the Network Connections proxy would get used. I was pleased to find that Network Connections does affect the ADT properly - I'm somewhere in Iowa between Des Moines and Council Bluffs and getting the platform.

tethered via G1, Proxoid, and Chrome
It is great to hear that tethering will be part of the OS on future phones. For now, tethering isn't too bad - the worst bit is getting the Android SDK installed if you don't have it already.
Proxoid app on G1
My G1 is using Android OS 1.6 and I doubt it will ever get the 2.x line. There are probably a bunch of tethering apps but the one I downloaded was Proxoid. When you open Proxoid, there is basically just an option to change ports and then a start / stop button. It crashed once but otherwise it appears reliable. When I was to tether my computer, I open Proxoid and click Start.
Android SDK
I assume that all tethering is the same: you start the proxy app on the phone and then use adb from the Android SDK to forward some TCP port on the computer to a port on the phone. Download and install the latest Android SDK and then add the tools directory to your PATH.
I forward TCP port 8080 on my computer to port 8080 on the phone. Port 8080 is currently the default port that Proxoid uses on the phone.
Chrome browsing
It isn't necessary to use Chrome but it is easy to open Chrome using a proxy and not have to change any settings. You could easily do this with FF or Safari if there is a command-line option to use a proxy or if you find the proper configuration settings.
Proxoid app on G1
My G1 is using Android OS 1.6 and I doubt it will ever get the 2.x line. There are probably a bunch of tethering apps but the one I downloaded was Proxoid. When you open Proxoid, there is basically just an option to change ports and then a start / stop button. It crashed once but otherwise it appears reliable. When I was to tether my computer, I open Proxoid and click Start.
Android SDK
I assume that all tethering is the same: you start the proxy app on the phone and then use adb from the Android SDK to forward some TCP port on the computer to a port on the phone. Download and install the latest Android SDK and then add the tools directory to your PATH.
I forward TCP port 8080 on my computer to port 8080 on the phone. Port 8080 is currently the default port that Proxoid uses on the phone.
adb forward tcp:8080 tcp:8080
Chrome browsing
It isn't necessary to use Chrome but it is easy to open Chrome using a proxy and not have to change any settings. You could easily do this with FF or Safari if there is a command-line option to use a proxy or if you find the proper configuration settings.
/Applications/Google\ Chrome.app/Contents/MacOS/Google\ Chrome --proxy-server=localhost:8080
Tuesday, May 04, 2010
touchstart and touchmove
For the most part, HTML5 apps test comparably in Safari and on the iPad. One difference that really jumps out is the touch events that the iPad / iPhone implements. My application initially bound events to the
From reading blogs and SO, it seems like the delay in
In the image below, you can see a big gray space - thats from clicking and dragging the screen down. After implementing the

click event but I noticed a delay in the iPad so I switched over to the touchstart event. When the application is running in iPad / iPhone, the whole canvas is draggable and looks crappy.From reading blogs and SO, it seems like the delay in
onClick is intentional in iPhone / iPad because the browser (UIWebView, in this case) is waiting to see if there is going to be a gesture. That makes sense to me so any cases where I had a .click I changed to a .bind(clickevent. I set clickevent = click by default but override with clickevent = touchstart when on iPhone / iPad.In the image below, you can see a big gray space - thats from clicking and dragging the screen down. After implementing the
event.preventDefault the view can no longer be dragged down.
$ git diff HTML/main.js
diff --git a/HTML/main.js b/HTML/main.js
index 4e7661b..5bceab2 100644
--- a/HTML/main.js
+++ b/HTML/main.js
@@ -23,6 +23,14 @@ if(window.Touch) {
     clickevent = 'touchstart';
 }

+// TODO - can combine with other iPad / iPhone checks but keeping separate
+// for now just to make it stand out
+if(window.Touch) {
+       document.ontouchmove = function(event) {
+        event.preventDefault();
+    }
+}
+
 $.ajaxSetup({
     beforeSend: function(xhr) { xhr.setRequestHeader("Emsauthtoken",localStorag
     cache: false,

Friday, April 30, 2010
Palm and WebOS
I wish things would have gone differently with Palm and WebOS. Reading almost nothing but negative press about the HP buyout of Palm has me thinking about it. From my perspective, Palm committed where RedHat, Google, and probably others just talk big about: they built devices that were really built on Web technologies. I've said before how impressive it was that Palm shipped their VM on VirtualBox - it was a specific, older version of VirtualBox - but it wasn't some opaque, crappy device simulator that other vendors provide. Building apps for devices with just HTML/CSS/JS is a great solution and it is supported in Android and iPhone but Palm made it THE solution.
My favorite quote found reading comments in the negative press:
Heh - it really is true. Today, seems like the press and most of the noisy people are Apple fan boys / girls but tomorrow it won't be the same and the 'obvious' stupidity of HP buying Palm may or may not be true.
WebOS will probably die at HP but it was a great effort by Palm. Shame.
My favorite quote found reading comments in the negative press:
At one time you could have said Apple was late since Palm already had the Smart Phone market cornered.
Heh - it really is true. Today, seems like the press and most of the noisy people are Apple fan boys / girls but tomorrow it won't be the same and the 'obvious' stupidity of HP buying Palm may or may not be true.
WebOS will probably die at HP but it was a great effort by Palm. Shame.
Thursday, March 11, 2010
HTML5 Buckets
Buckets has been idle for many months and I still haven't gotten Shanelle using it. Something - I think it was Luke - got me thinking about finishing the iPhone version. In fact, starting and then finishing the iPhone version :) I feel the need for doing it in HTML5 - this app is a good candidate for a non-native application implementation.
I started looking around for demo apps that had the components I need and handily bonked into webkit.org/demos/sticky-notes/ I dream of a competitive WebOS device so it is nice that iPhone and WebOS should have very similar implementations. Here's the first bit of goodness.
There are some important rules going on - this bit is telling the browser exactly what resources to make available when the application is in offline mode. Sticky Notes is mostly CSS so the manifest is micro but it's still a good start. Some bits that I've picked up in other places: the page that includes the manifest= is automatically whitelisted; fallback is how you replace resources with an offline-specific image or resource; the content of the manifest has to change for the browser to recognize a difference - it isn't the timestamp or the filename / path.
I started looking around for demo apps that had the components I need and handily bonked into webkit.org/demos/sticky-notes/ I dream of a competitive WebOS device so it is nice that iPhone and WebOS should have very similar implementations. Here's the first bit of goodness.
$ curl --include  http://webkit.org/demos/sticky-notes/StickyNotes.manifest
HTTP/1.1 200 OK
Date: Thu, 11 Mar 2010 06:01:37 GMT
Server: Apache/2.2.14 (Unix) mod_ssl/2.2.14 OpenSSL/0.9.8l DAV/2 mod_python/3.3.1 Python/2.5.4
Last-Modified: Sat, 13 Jun 2009 00:53:08 GMT
ETag: "38-46c303f980500"
Accept-Ranges: bytes
Content-Length: 56
Content-Type: text/cache-manifest

CACHE MANIFEST
deleteButton.png
deleteButtonPressed.png
There are some important rules going on - this bit is telling the browser exactly what resources to make available when the application is in offline mode. Sticky Notes is mostly CSS so the manifest is micro but it's still a good start. Some bits that I've picked up in other places: the page that includes the manifest= is automatically whitelisted; fallback is how you replace resources with an offline-specific image or resource; the content of the manifest has to change for the browser to recognize a difference - it isn't the timestamp or the filename / path.
Sunday, February 28, 2010
where are symbol-based domains
It occurred to me that I've never seen a symbol-based domain in use. For example, why haven't I ever seen a symbol in a domain - especially some domain like http://www.i♥android.com/?
From my late-night skimming (I'm saying I didn't really read much - this is what I've gleaned) it looks like in 2005 DNS switched from ASCII to Unicode. The support for Unicode domain names appears to be there in all common browsers. I tested Chrome, Safari, Firefox, and IE and all of them behaved the same way.
It seems like people should have started using symbols for fun. No doubt there are non-US domains that require unicode but I'm just thinking about the vanity type stuff. It looks like Network Solutions briefly allowed symbols in .com domains (£.com and ♥.com) but doesn't anymore. Out of curiousity, I attempted to register i♥android.com at a few registrars and was consistently blocked. I then attempted to register i♥android.ws at 3 registrars and 1 allowed it (GoDaddy). Interesting.
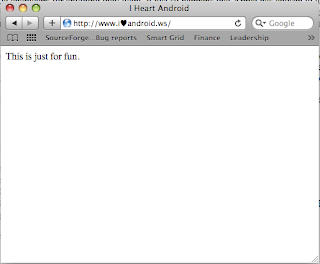
Safari hits symbol-based domains nicely. My version of Chrome hit my play domain correctly but then munged the URL. Silly.
Speaking of silly - let's say that people were using symbol-based domains for vanity stuff or marketing - in both cases, they'd probably want to use the vanity names in social sites. Why aren't usernames allowed to contain unicode? I only checked a few sites and they only wanted simple ASCII. I wonder if there is a reason that I'm unaware of or if it is just easier for devs to not think about more complicated usernames.


As a side note - I've read that Windows people would see the Windows logo in this domain and Mac people would see the Apple logo. What do you see? http://i♥.com/.
From my late-night skimming (I'm saying I didn't really read much - this is what I've gleaned) it looks like in 2005 DNS switched from ASCII to Unicode. The support for Unicode domain names appears to be there in all common browsers. I tested Chrome, Safari, Firefox, and IE and all of them behaved the same way.
It seems like people should have started using symbols for fun. No doubt there are non-US domains that require unicode but I'm just thinking about the vanity type stuff. It looks like Network Solutions briefly allowed symbols in .com domains (£.com and ♥.com) but doesn't anymore. Out of curiousity, I attempted to register i♥android.com at a few registrars and was consistently blocked. I then attempted to register i♥android.ws at 3 registrars and 1 allowed it (GoDaddy). Interesting.

Safari hits symbol-based domains nicely. My version of Chrome hit my play domain correctly but then munged the URL. Silly.
Speaking of silly - let's say that people were using symbol-based domains for vanity stuff or marketing - in both cases, they'd probably want to use the vanity names in social sites. Why aren't usernames allowed to contain unicode? I only checked a few sites and they only wanted simple ASCII. I wonder if there is a reason that I'm unaware of or if it is just easier for devs to not think about more complicated usernames.


Subscribe to:
Posts (Atom)