Saturday, December 26, 2009
sledding fun
Has fun sledding today - great hill! Adam and Griffin were there so that was extra fun for the kids. Blake and Kimberly sledded a bit with Asher and even pulled him up the hill a couple times! :)
Friday, December 18, 2009
moving servo via pot; even has a blinking LED
After 2 days without electronics due to illness, I am feeling better and was happy to pull out the stuff. Shanelle wasn't so happy but we watched a movie while I played. I read the oscillator section in the 18F2455 datasheet and felt a lot more comfortable with the oscillator config; in addition, I learned that PWM uses timer 2 so I learned about the pre / post scalers there. I set everything up and was confident that I had the correct timing values but wasn't getting reliable servo movement (servo wasn't dancing either so I was thinking that I had made progress). Michael suggested batteries; I set up an LM7805 and tried driving the servo off my crappy power supply again but using 12V + LM7805; servo still pulsing; Michael suggested batteries. I tried batteries on the servo and now had a stable servo :)
I added a potentiometer to the circuit and adjusted the code to read the pot and position the servo accordingly. I put a video on youtube and then shortened the delay between reads. We're really getting somewhere now :) This code is responsive and good enough to pass along to Greg for testing with a valve and servos while I work on it more to actually considering the pressures and what they mean.
I added a potentiometer to the circuit and adjusted the code to read the pot and position the servo accordingly. I put a video on youtube and then shortened the delay between reads. We're really getting somewhere now :) This code is responsive and good enough to pass along to Greg for testing with a valve and servos while I work on it more to actually considering the pressures and what they mean.
#include
#include
#include
#include

// app uses internal oscillator, RA6 for IO
#pragma config FOSC = INTOSCIO_EC
// OSCCON = 0b01110000; should switch to 8Mhz ??

#pragma config BOR = OFF // Brown out reset
#pragma config LVP = OFF // Low voltage programming
#pragma config WDT = OFF // Watchdog timer

// use pin 11 for basic LED indicator
#define LEDPin LATCbits.LATC0
#define LEDTris TRISCbits.TRISC0

void main() {
 // pre / post scalers at 1:16 / 1:2
 T2CONbits.T2CKPS1 = 1;
 T2CONbits.T2CKPS0 = 1;
 T2CONbits.T2OUTPS3 = 0;
 T2CONbits.T2OUTPS2 = 0;
 T2CONbits.T2OUTPS1 = 0;
 T2CONbits.T2OUTPS0 = 1;

 // the period is 25ms
 OpenPWM1(250);

 // TODO - understand all these flags
 OpenADC(ADC_FOSC_8 & ADC_RIGHT_JUST & ADC_0_TAD,
  ADC_CH0 & ADC_INT_OFF & ADC_VREFPLUS_VDD & ADC_VREFMINUS_VSS,
  0b1011);
 SetChanADC(ADC_CH0);

 LEDTris = 0; // make sure LED pin is an output pin
 LEDPin = 1; // turn LED on
 while(1) {
  LEDPin = ~LEDPin;
  Delay10KTCYx(5); // (.2s delay between reads)

  ConvertADC();
  while(BusyADC());
  // through experimentation, I found that a 'duty cycle' between
  // 18 and 81 was about right; my pot in my circuit is giving
  // 0 to 4.2V so I'm multiplying by 1.2; the ReadADC returns a
  // 10 bit result so dividing by 16 to put me 0 to 63
  SetDCPWM1(18 + ((int) (1.2 * ReadADC()) >> 4));
 }
}
Tuesday, December 15, 2009
first time with MPLAB and PIC
Edward, Greg, and I have been Waving about a Fantasy Throttleable Hybrid rocket. The electronics for the rocket are interesting to me, and the machining of the rocket parts is beyond my abilities, so I'm setting up an environment to work on the controller for the rocket. I'm new to programming the PIC but am interested since it is used in so many projects.
It seems common for hobbyists to develop in ASM for the PIC but I chose C. To get some hand-holding, I went through Tutorial 4 at pic18f.com and it was exactly what I needed from an introduction. Here are a few bits that I had to bump into myself.
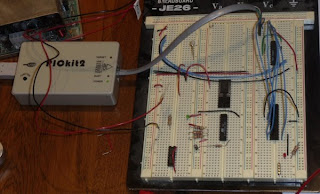
I use a MacBook as my primary machine and do most things related to rocketry within a WinXP VM using VirtualBox. I figured I would simply plug in the PICkit2 (it is USB), assign it to my VM, and go on with the Tutorial. When I plugged in the PICkit2, it appeared in the USB list in my VM but it was Unavailable. I checked the VirtualBox forums and there were some special chicken dances that people claim work but the following steps appear to be reliable for me.
Here are some pictures:


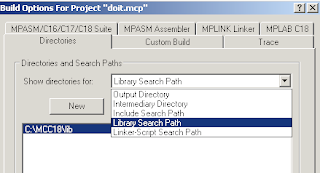
It is mentioned in the tutorial that the Library Search Path will probably need to be set but I assumed that since I went with all defaults on my install that it would be already set. It wasn't - I got a build error telling me that c018i.o was not found. I just went in to Build Options..., clicked on Directories tab, changed the drop-down to Library Search Path, and set the value to C:\MCC18\lib.

Just like the Tutorial said, you can say "Programmer -> Release from Reset" to run the app that is in Flash on the PIC. You can do "Programmer -> Set Vdd Off" to turn the PIC off. Neato - easy peasy.

Once the PIC is programmed, you can remove the PICkit2 and plug in a 5V power supply. Positive goes to pin 20 on the 18F2455 that I'm using and Ground goes to pins 8 and 19. As soon as power is turned on, the app in Flash runs.

It seems common for hobbyists to develop in ASM for the PIC but I chose C. To get some hand-holding, I went through Tutorial 4 at pic18f.com and it was exactly what I needed from an introduction. Here are a few bits that I had to bump into myself.
PICkit2 Kinda Tricky with VirtualBox
I use a MacBook as my primary machine and do most things related to rocketry within a WinXP VM using VirtualBox. I figured I would simply plug in the PICkit2 (it is USB), assign it to my VM, and go on with the Tutorial. When I plugged in the PICkit2, it appeared in the USB list in my VM but it was Unavailable. I checked the VirtualBox forums and there were some special chicken dances that people claim work but the following steps appear to be reliable for me.
- Set up USB Filter for PICkit2 and put at top of VM config.
- Boot VM
- Plug in PICkit2 at Windows log-in screen.
Here are some pictures:


MPLAB Library Path needs setting
It is mentioned in the tutorial that the Library Search Path will probably need to be set but I assumed that since I went with all defaults on my install that it would be already set. It wasn't - I got a build error telling me that c018i.o was not found. I just went in to Build Options..., clicked on Directories tab, changed the drop-down to Library Search Path, and set the value to C:\MCC18\lib.

Run App using PICkit2 / USB Power
Just like the Tutorial said, you can say "Programmer -> Release from Reset" to run the app that is in Flash on the PIC. You can do "Programmer -> Set Vdd Off" to turn the PIC off. Neato - easy peasy.

Run App using External Power
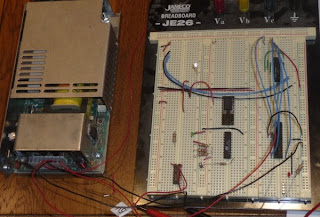
Once the PIC is programmed, you can remove the PICkit2 and plug in a 5V power supply. Positive goes to pin 20 on the 18F2455 that I'm using and Ground goes to pins 8 and 19. As soon as power is turned on, the app in Flash runs.

Subscribe to:
Posts (Atom)

